Go get yourself a map of the area you intend to walk in. There is an extensive range of maps available including brochures, walking books and, best of all, well detailed topographic maps. In general, go for the map with the most detail of where you want to walk.

Using the sun to find north

Firstly, familiarise yourself with it… Things to look for include scale, contour intervals, colours, start point of your journey, which way is north.

Put your map into an A4 size mapcase, with the side up being the area to be walked, and the reverse side showing the route card.

A route card is a sheet detailing the walk you have planned to do, including grid references, steepness/elevation, estimated times & distances and other relevant information.

Example of Route Card

This is an example of a route card, other information it can contain includes the height gained and lost during each leg of the route, estimated and actual times.

Leg Start Finish Bearing Distance Comments
1 535798 547235 23 1.5KM Creek crossing,
200m climb
2 547235 553748 130 1KM road junction,
watertank nearby
3 553748 537890 250 2KM flat forest area
for most of the way
4 537890 524784 280 1.7KM 600m hill, lunch at
the trig point
5 524784 503278 295 1.3KM 600m descent watch
out for rock faces

Before you start walking, locate your position on the map.

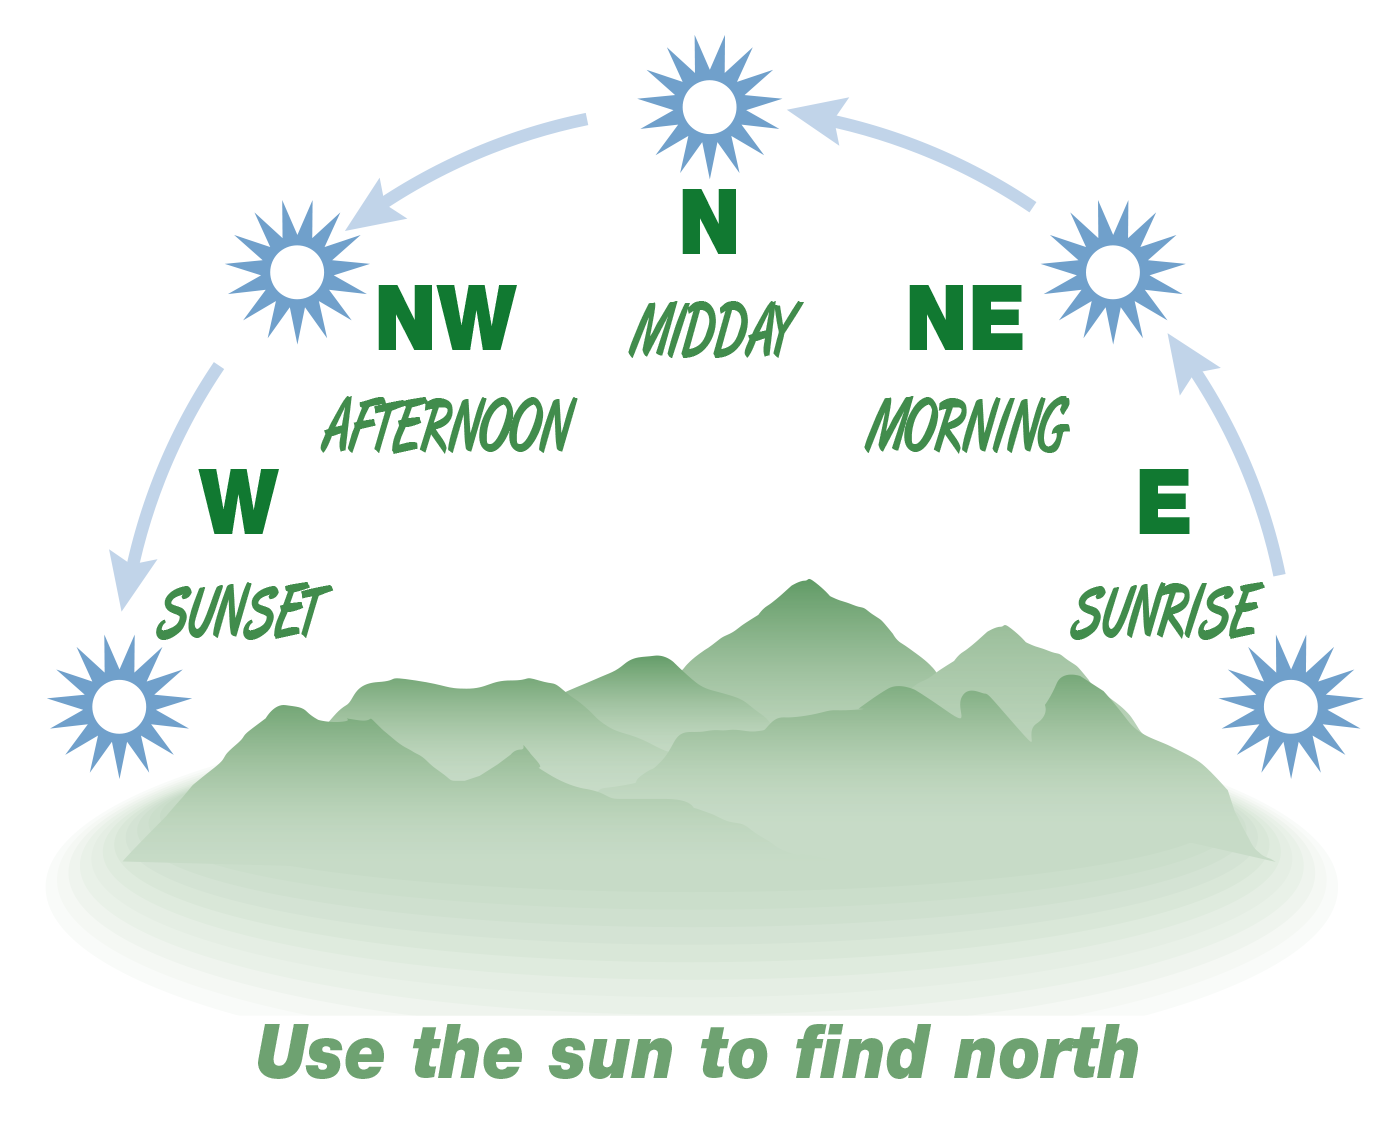
Always know where north is on your map, and always point your map north!

Once you have found that, you are on the way!

How to find north without a compass, using the stars and Southern Cross

Finding north without a compass

Sun rises in the east, sets in the west, halfway through the day (around 12 pm) it is north (in the southern hemisphere).

At night, if you can see the southern cross, you can find south. once you can find south, you can find north!

Understanding grid references on topographic maps

Grid References

A grid reference (GR) is a set of numbers (usually 6) that will indicate a point on a map. A six figure GR looks like this 574 678. THE FIRST 3 NUMBERS indicate how far EAST the point is on the map, and THE SECOND 3 NUMBERS indicate how far NORTH the point is on the map. GRs are always relative to the map you are using, so always quote the map you got it from.

This is how it works…

There are straight lines drawn on South Australian (and most Australian) topographic maps called Grid Lines. These lines are 1km apart, and about 1.5 km from corner to corner. These lines are numbered along the bottom and up the side of the map and are called grid numbers. They range from 00 to 99. The grid numbers along the bottom are called eastings, because the numbers increase as you go east, and up the sides; northings. This is for the same reason. For all references, always read eastings first.

Divide the 1 km space between gridlines into 10 lots of 100m and number them 1 to 0. So, a six figure grid reference will be split into 2 groups of 3 numbers.

Understanding contours on topographic maps

Contour Lines

Contours are drawn on a map linking up places of the same height. These lines are at standard intervals (called contour intervals and found on the map legend). South Australian topographic maps are usually 10 m apart, but make sure you check. These lines indicate height above sea level on a map and will tell you how much up and down hill sections your intended days walking will have. Understanding contour lines is ‘the trick’ in improving your navigation. The closer the lines are together, the steeper the terrain is.

How to use a compass and a topographic map

Compasses

A compass is handy in poor visibility, in thick scrub or to confirm where you are. See the illustration for an example. Protractor compasses have a medium sized base plate with easy to read numbers on it. Practice using a compass and understand the variances in “north” (magnetic/grid).

Navigation training

If navigation is an issue, you are not alone. Think about improving your skills. Learning navigation (getting rid of that lost feeling) is excellent for your bush walking confidence and competence.

Bushwalking Leadership SA offers courses in navigation, bushwalking skills and leadership for beginners to experienced bushwalkers.

Other places to consider could be orienteering or rogaining clubs, or bushwalking groups.

Natmap - Map Reading Guide, how to use topographic maps, 2005, cover

Resources

Natmap put out an excellent booklet that will get you started It is called Map Reading Guide – how to use topographic maps and costs around $4. It comes with a bonus plastic map card. This will help you develop your map reading skills. It is available from outdoor retailers.

Disclaimer to Guide to Better Bushwalking

A Guide to Better Bushwalking: Disclaimer

Bushwalking Leadership SA

Bushwalking Leadership South Australia, in putting this information together, does in no way suggest that this is the ultimate guide and STRONGLY recommends anyone interested in bushwalking to educate themselves in the dangers involved with this activity.

Bushwalking Leadership SA STRONGLY advocates first aid training and recognised outdoor leadership training before leading groups of any sort of bushwalking.

This information is intended as a prompt or introduction to some of the basics of enjoyable bushwalking.

National Parks/Government Trails

Trails are provided for your enjoyment and should only be used in accordance with the Code. Trail users must be adequately prepared and obtain relevant information and maps. The trail conditions may vary from time to time, and trail users are advised to check weather conditions prior to leaving. Persons should use caution at all times when using trails in South Australia.

Copyright

This information was originally published in 2004. View credits.

Bushwalking Leadership SA